DIY Refrigeration Fan - The Finkelstein Fan
 Here's
an equipment tip from Bill - A slightly different version of this
write up also appeared in the April 1, 2004 issue of Practical
Sailor as a letter to the editor.
Here's
an equipment tip from Bill - A slightly different version of this
write up also appeared in the April 1, 2004 issue of Practical
Sailor as a letter to the editor.
We used to have a
problem with stuff in our boat fridge freezing and goodies in our
freezer defrosting. Also, the bottom of the two boxes was around
10 F colder than the top.
Our unit is a holding plate model
that relies on convection to move the air around in the
box.
After a long diagnostic process, I determined that the
easiest way to fix this problem was to add fans to the fridge and
freezer to mix up the air
Commercial units are available
ranging from $40 to over $100, but we built our own for under
$10.
Granted, a high-quality unit manufactured and sold by
a small business is generally more expensive than a DIY project,
but fabricating an equivalent unit from a few parts is so trivial
that even the most thumb-laden boat owner should be able to do
it.
What used to be a 10-degree difference between the top
and bottom of our refrigerator and freezer box is now uniform. The
important test is that the lettuce doesn’t freeze in the
fridge and the steaks don’t defrost in the freezer.
Details:
The fan is the most expensive part it's from
Jameco http://www.jameco.com,
a great source for “geeky” electronic parts. . It’s
Jameco part number 207052CP. Specifications: 12V, 0.06A (Only 1.44
Amp-Hours! Day!), 5.5 CFM (enough to stir things up, which is all
you need), with ball bearings (important for longevity and
continuous operation). Price: $6.95. Its dimensions are 1.6”
square by .25” inch thick.
The 63-cent fan guard is
Jameco part 123502CP. The pipe is 1.5” PVC (available at any
hardware store) with your choice of 45- or 90-degree elbow. Plus
some miscellaneous parts—wire, connectors, fuse, fuse
holder, some screws, tie-wraps and/or double stick tape. Total
cost: a few bucks.
Construction method:
1. Measure
your box, and cut the PVC a bit shorter—allowing for any
slope in the side of the box. Cut the bottom of the pipe at an
angle (e.g. 45 degrees) or use another elbow so that you can rest
the bottom of the pipe on the bottom of your box without blocking
airflow.
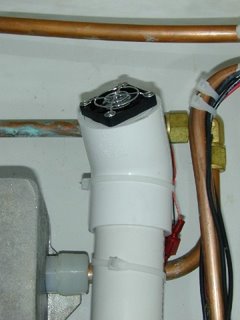
2. Attach your pipe to elbow. Put a short stub of
PVC in the other end of the elbow so you can use four little (#4)
screws to attach the fan and fan guard to the PVC (see picture).
Note: We didn’t glue anything—the snug fit was
sufficient.
3. Wire up the fan to your boat’s 12V
electrical system—be sure to follow proper wiring
procedures. We ran the wires through the same opening in the side
of the box that our refrigerant tubes pass through, and sealed
things up with modeling clay. We connected two fans (one for the
fridge, one for the freezer) through a fuse holder and 0.25-amp
fuse to a circuit that’s always on when we’re running
the fridge.
4. Attach the assembly to the inside of the
box. We found it convenient to use tie-wraps, but double stick
tape would also work fine.
Building the fan tube took less than 15 minutes. Mounting the two tubes and running the wires took a little over an hour.